Freezing Motion
To freeze motion you need to use a moderate to high shutter speed. In Understanding Shutter Speed, Bryan Peterson recommends using a shutter speed of at least 1/250 sec. for subjects moving towards or away from you. For subjects moving up and down or left to right use a shutter speed of at least 1/500 sec, 1/1000 sec. is best but you can usually pull it off with 1/500 sec. That is just a general “rule” I like to keep in mind. I took this picture using a shutter speed of 1/320 sec. and didn’t get any blur so you can vary a bit.
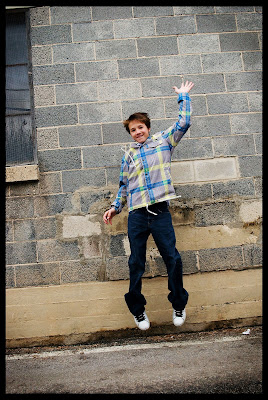 Just know if there is blurring in your picture (and you don’t want it there) you need to up your shutter speed.
 Panning
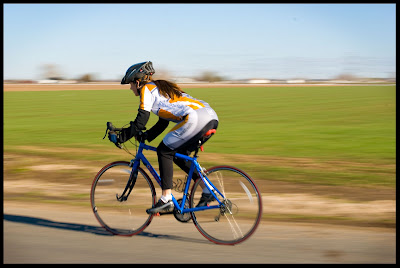
Panning is fun. It also requires a bit of luck and usually, a lot of takes. The “trick” to panning is to set your shutter speed low, usually somewhere between 1/8 and 1/60 sec and move your camera parallel to, and at the same speed as the moving object you wish to capture. As the object enters your frame, focus on it and follow it (smoothly) with your camera snapping away. This will keep the moving object in focus and give the background a really cool blur. Dave took this picture of me using a shutter speed of 1/40 sec.
Another cool way to get the panning effect is to actually be moving AT the same speed as what you are taking a picture of and snap away. For example, I took this picture of my feet while on a swing.
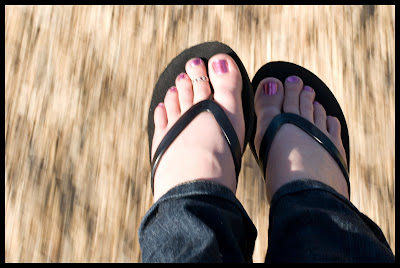 I set my shutter speed to 1/60 sec., got going fast, focused on my feet and took the picture. I used the same technique to take this picture of my daughter for the motion challenge.
I set my shutter speed to 1/60 sec., got going fast, focused on my feet and took the picture. I used the same technique to take this picture of my daughter for the motion challenge.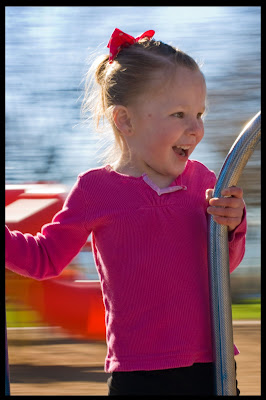 I set my shutter speed to 1/40 sec and hopped on the moving merry-go-round with her.
 Implying Motion
If you ever want to add Pizzazz to something boring (in my case this sign) try this technique. To imply motion select a low shutter speed. In this picture I used a SS of 1/50 sec but it usually works better if you go lower.
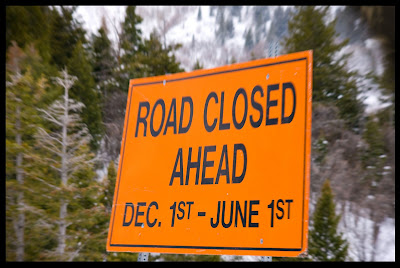 Next, press your shutter release button WHILE zooming in on object. It’s kind of tricky and like panning can take quite a few tries.
 Flowing Water
If you want to give flowing water an ethereal, cotton candy effect then, you guessed it, choose a sloooow shutter speed on your camera before snapping away. To capture this waterfall I set my SS to 1/4 sec.
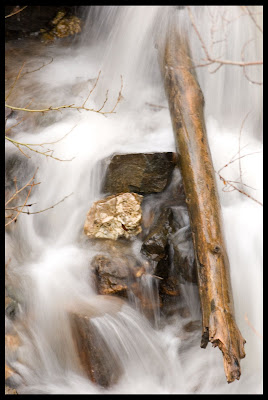 You can usually get away with 1/30 sec or lower; it just depends on how much “flow” you want in your picture, for more flow, go with a lower SS.
 Capturing rain/snow
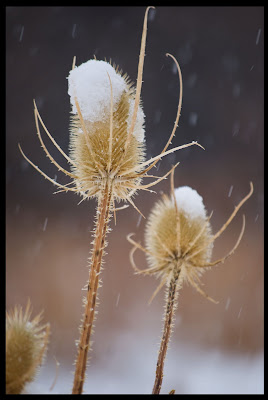
There are two options when trying to capture rain or snow in a picture. If you want to capture a few, defined flurries then a faster shutter speed is required. In this picture I used a shutter speed of 1/200 sec.
 If you want to capture more motion in your rain/snow, you need a slower shutter speed. In this picture I used 1/5 sec.
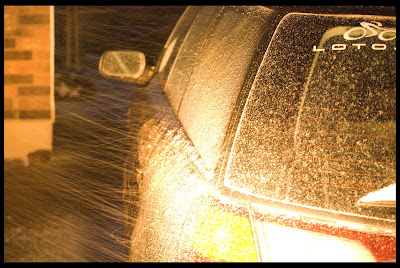
In his book, Understanding Shutter Speed, Bryan Peterson recommends using 1/60 sec. when capturing rain. Which really seems like it would be about perfect and result in something in between my two shots.
Shooting at Night
Now, this is where it really gets fun, at least for me. When shooting at night you can get some REALLY cool shots (I searched through my archives and couldn’t find the one I wanted so you will just have to use your imagination on this one ;)). Slowing the shutter speed down allows you to shoot without a flash in low light or no light situations. This, if you’re like me and avoid using the flash at ALL costs, is simply fabulous. The possibilities are endless…the stars and moon, city lights, freeway lights…you can definitely have some fun. You will have to play around but a shutter speed of 1/2 sec to 4 sec usually works pretty well. In these cases not only is a tripod essential but you will probably need a remote because when you touch the shutter release button it moves the camera which will blur your picture in long exposures like this. No remote? No problem, just use the self-timer.
When playing around with your shutter speed always keep in mind the tripod rule. If your shutter speed is equal to or slower than the reciprocal of your effective focal length, you need to use a tripod. For example if my focal length is 200mm and I’m shooting with a shutter speed of 1/30 sec. I should probably be using a tripod. If you don’t have a tripod handy don’t despair! Simply brace yourself against something sturdy, hold your breath and click. If possible look for something stable to rest your camera on, I’ve used guard rails, the hood of my car, a rock and a sturdy tree branch before.
Most point and shoot cameras have modes that set the shutter speed a certain way to achieve a desired effect. I know Dave’s camera has an action mode (high shutter speed), a night mode (slow shutter speed) and a flowing water mode (slow to moderate shutter speed). These are AWESOME because if the camera doesn’t allow you to manually change the shutter speed these modes give you quite a few cool options.
Now, grab your camera and go play ;)


7 comments:
Awesome, awesome, awesome!! Super great tutorial. I can't thank you enough for taking the time to share your knowledge and understanding of "how things work." I can't wait until I get to play with what you've just taught!! Thanks!!! :)
GREAT tutorial, Brittney!! I love your photo examples, and you made everything so clear. LOVE it!
FABULOUS, FANTASTIC, UTTERLY PERFECT!!!!!
I'm SO GLAD you did this tutorial, Brittney, it's exactly what I've been wondering (what with my new camera n' all... cheshire grin) and the panning and water parts were what i've really been curious about!!! you explained it perfectly!!
i'm typing as fast as i can so i can go out and PLAY as per instruction! :)
but i also am really excited to do some night shots, i've never tried that!!! oh and one more thing, the Implying Motion... SOOO COOL!!!!
thanks so much!!
Thank you Britt, that was a very good tutorial, I love trying different shutter speeds.
Wow, great tutorial!! I really liked the sign picture, it actually made me a little dizzy to look at, I think that is why I liked it so much! I need to really go practice this stuff!! thanks!
Great job, Brittney!! Loved all the info and excellent pictures!
WOO HOO! So cool! Thanks for doing this tutorial! I think it had so much valuable info!
Post a Comment